Showing posts with label Regency gown. Show all posts

Tuesday, February 28, 2017

Zippable Regency Gown

This week, I finished a commission inspired by this 1810 gown from the MET:

Cotton Dress, American, c. 1810-15, MET, 1999.224


The fabric of my dress is a lightweight, embroidered, cotton voile. I purchased mine from a shop in Atlanta, but it is almost identical to this fabric offered by Burnley and Trowbridge. The customer I was working with most definitely did not want a white dress, but almost all the voile fabric I found with any kind of interesting embroidery or stripe detail was to be found in white! Solution: dye it. The last time I dyed any signifiant length of fabric was in college, but it was pretty successful then, so I decided to dye the white fabric to the dove grey that my customer wanted. The color selected was one of Dharma's procion dyes, Mist Gray. It produced a soft lavender gray. There are some great dye tutorials out there, so I won't add a tutorial, but here is a snapshot of the process!

1. The necessary stuff! 2. Dye mixed and added to tub. 3. Stirred.
4. Salt added! 5. Stirred. 6. Calsolene oil added! Just a smidge.
7. Fabric dumped in. 8. Soda Ash added (CAREFULLY). 9. Stir. And stir and stir. 
I didn't take many in-progress photos (it is so hard to remember to do this), but I did photograph the finished garment. It is a floor-length gown with short puff sleeves, and removable long sleeves. The lining extends to the body and skirt (the sleeves are unlined).


The lower sleeves attach to the band of the short puff sleeves with hooks and hand-stitched eyes (effectively loose bar tacks.) I interfaced the interior of the puff sleeve band ONLY, cutting it off at the seam allowances, so it was pretty sturdy for the stitched eyes. I handmade the eyeloops because when the lower sleeves are removed, that area would rub against skin, and I didn't want stiff metal eyes to aggravate the soft skin inside the arm. For the undersleeves, I interfaced about 3/4" from the top, and finished the edge with a 5/8" wide bias binding, stitched to the interior of the sleeve. This rendered it sturdy enough for hooks.


Since there is a little variation in the placement of each hook and eye on
each sleeve, I embroidered them to indicate which is right and left.
This customer is a dancer, and wanted to make sure she could lift her arms over her head, so I added in a little fish gusset under the arms. A little extra flexibility goes a long way!


The sweet little puffed sleeves are adorable, in my opinion. When the sleeves are removed, the silhouette feels so different! Removable sleeves = two dresses in one!


My favourite part of this dress is actually... the closure in the back! While I love making historically authentic garments, I love my customers wearing them even more, and this customer wanted to be able to easily get into and out of her dress all by herself. So I used an invisible zipper and some covered buttons left over from a wedding gown I made a while back, and created a lapped closure. In order to keep the lapped bit shut, I added a couple tiny hooks and eyes.


This shows a tiny glimpse of the skirt lining, pleated
with much larger and less tedious pleats than the exterior
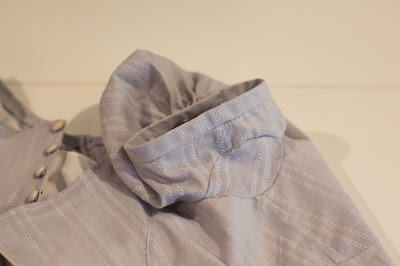
Below are some obligatory guts pictures. The gathered outer bodice was lined with a fitted lining. The exterior fabric is gathered at center front and totally adjustable at the top edge with a narrow striped drawcord. The sleeve edges are whipped - I debated binding them, but felt it would add a lot of bulk, especially in an area that has a bit of extra fabric anyway because of the gusset. At the top of the shoulder are tiny snap straps to hold a bra strap, since this dress would not be worn with stays.


And that's it! This was a super fun project, and the customer was awesome to work with. We met a total of three times: first to measure and talk design details/fabric, second to fit the muslin and confirm the color via dyed swatches, and third to fit the actual dress in its semi-finished state (confirming things like hem lengths, how the fit feels in final fabric, etc.) First costume of 2017, finished!


Thursday, May 23, 2013

Gown Design

So, I think I have figured out what I want my dress to look like. During this research phase, my own gown has been kind of put on the back burner, because I feel like I have SO much to learn about menswear. However, I finally cooked up a plan for my dress over the past week!

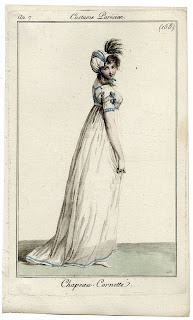
As I was researching, I found this plate:


I think the pattern of the ribbon applique is so striking! I pretty much decided to straight-up knock off the plate for the back ribbon pattern. In order to make sure this wasn't just a weird thing that showed up in one fashion plate, ever, and nobody would ever wear, I found a couple of other resources... (all fashion plates, I know, but they'll do for me!)


None of the plates above inspired me more than the first one, so I kept with that ribbon pattern. However, I still had a dilemma - the back of the dress on the fashion plate wasn't actually a v-neck (or at least, wasn't colored to have one.) So I rummaged through my Pinterest board until I found a dress (not over-dress, like the one above) with a back v-neck:


That satisfied my need to verify that back v-necks happened. All good there! On to fabric. I wanted a striking fabric, something that would compliment that detail and make the dress pop. I am pretty fine with taking a slightly "costumey" bent with this project, putting design principles to use while referencing a general knowledge of the period (instead of JUST knocking off fashion plates, which is much more safe and reassuring but often a little less interesting). Sooo... as a teeny-tiny tribute to Les Miserables, I decided to use red/white striped taffeta, with black trim. ("Red - a world about to down! Black - the night that ends at last!!!" Just imagine that epic refrain, it doesn't type out as well as it sounds). I found this lovely one-by-one 1/2" stripe at Renaissance Fabrics. 1/2" might be a smidgen wide, 3/8" or even 1/4" might be better, but it is surprisingly challenging to find a good 1x1 stripe silk taffeta.
Now, dilemma. What should the front look like? I sketched up a few options - bib-front, flat-front, gathered (drawstring at the waist) front, and chevron-front (with a seam down the CF and stripes cut on the bias.) I am leaning toward option D, but still considering. Opinions?


The back of the dress I decided to augment with buttons instead of diamonds at the small of the back, and long 4"-5" tassels that I will need to make with silk embroidery twist. I love this back detail! Excited to get to patternmaking.